
Heirloom - Getting Started
In this tutorial we will create a very simple application that creates a window and displays: "Hello World".
These tutorials are written assuming that the program is running on NET Core 3.0. The libraries themselves are NET Standard 2.1 compliant. If you don't have .NET Core 3.0 (or newer), then you can download it here.
Using Visual Studio
To get started, lets create a new C# project. Choose Console App (.NET Core), name it "HelloWorld" and put it somewhere on your computer:
Once created right click the project in the Solution Explorer and click on Manage NuGet Packages... > Browse and search for Heirloom. You should see several projects with the naming pattern of Heirloom.XYZ where the XYZ part is the project name. I will typically refer to projects like Heirloom.Math just as Math to be concise.
To create any desktop application using Heirloom we will need to include Heirloom.Desktop. This will automatically include all dependancies that Heirloom.Desktop requires. Thus it will also install Heirloom.Drawing, Heirloom.IO and Heirloom.Math.
Command Line
$ mkdir HelloWorld
$ cd ./HelloWorld

$ dotnet new console
This will create a C# project file in the HelloWorld/ directory called HelloWorld.csproj. It should also create a simple "Hello World" example app in Program.cs.
To create any desktop application using Heirloom we will need to include Heirloom.Desktop. This will automatically include all dependancies that Heirloom.Desktop requires. Thus it will also install Heirloom.Drawing, Heirloom.IO and Heirloom.Math.
$ dotnet add package Heirloom.Desktop
You may want to use a pre-release version (ie, alpha or beta). If you choose to do this, you'll need to use:
dotnet add package Heirloom.Desktop --version 0.9.0-alpha
You can find the exact version on Nuget.
Hello World
At this point, the Command Line or Visual Studio experience should be more or less the same. There are obviously differences in how to go about editing code and other utilities but we will mostly be looking at the code.
Now, lets open Program.cs. You should see something like this:
using System;

namespace HelloWorld
{
    class Program
    {
        static void Main(string[] args)
        {
            Console.WriteLine("Hello World!");
        }
    }
}
Now change the program to match the following:
using Heirloom.Desktop;
using Heirloom.Drawing;
using Heirloom.Math;

namespace HelloWorld
{
    internal class Program
    {
        private static void Main(string[] args)
        {
            Application.Run(() =>
            {
                // ... application logic
            });
        }
    }
}
Note: Due to quirks in the underlying windowing library, applications using Heirloom.Desktop must call Application.Run in the main method before using any windowing features to establish the window thread. This is a blocking call that sets up the window system and will continue to block until all windows are closed. The function passed into Run can be considered a pseduo main function. The function is called once the windowing system has been intitialized and you can then create a window and begin drawing on it.
So, let's create a window and clear it with a dark gray color.
using Heirloom.Desktop;
using Heirloom.Drawing;
using Heirloom.Math;

namespace HelloWorld
{
    internal class Program
    {
        private static void Main(string[] args)
        {
            Application.Run(() =>
            {
                // Create a window
                var window = new Window("Konnichiwa Sekai") { Size = (400, 200) };

                // Creates a render loop, calls OnDraw each frame.
                var loop = RenderLoop.Create(window.Graphics, OnDraw);
                loop.Start(); // Go!
            });
        }
    }
}
This creates a window (which is visible by default) and additionally sets up a render loop thread. This loop invokes OnDraw for each rendered frame. We currently have not defined the behaviour of OnDraw so let's do that now.
private static void OnDraw(Graphics gfx, float dt)
{
    gfx.Clear(Color.DarkGray);
}
Lets run this program! Assuming you're using Visual Studio, right click the project and select Set as StartUp Project (if it wasn't already). Then press Ctrl + F5 to build and run the program. If you're using the Command Line, execute dotnet run -c Release from the project folder.
You should see a window like the following:
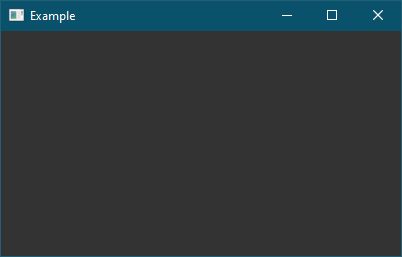
Great! Albeit boring. So lets draw some text to spice it up. In your OnDraw function, add the following lines:
var pos = new Vector(gfx.Surface.Width / 2, 78);
gfx.DrawText("Hello World", pos, Font.Default, 48, TextAlign.Center);
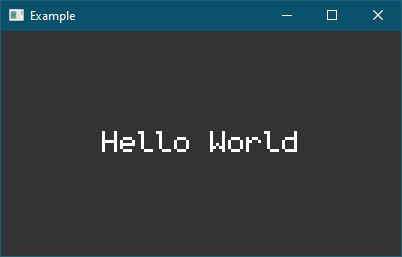
Success!
In the next part, we will modify this example to draw an image and some basic shapes to the screen.